In the clinic, the same scene is always played out at that moment.
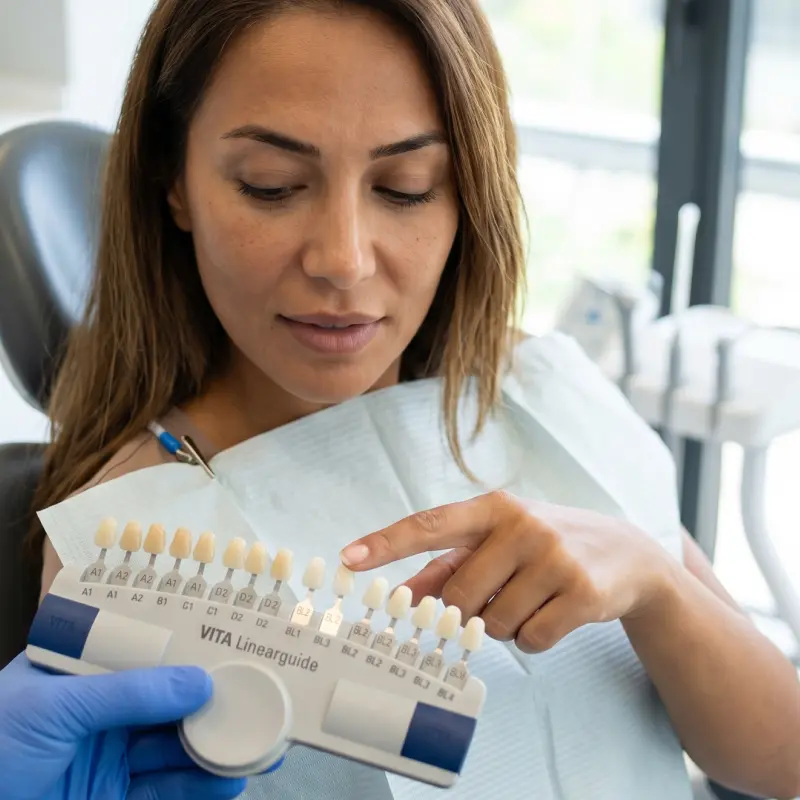
The dentist extends the shade guide in their hand. Dozens of small tooth samples are lined up on it. Numbers and letters: A1, A2, B1, BL1, BL2, BL3… “Which one do you want?” they ask.
And the patient — seeing this scale for the first time in their life, not knowing what these letters mean — has to make a decision at that very moment.
What do most people do? They point to the lightest color. “Let it be the whitest,” they say.
And this is the most common cause of veneer regrets.
Why “Whitest” is Not Always Best?
To understand this, one must first know this: natural teeth are never pure white.
Even the shade of a healthy, young, never-discolored tooth is slightly yellowish, a bit of an off-white. This is because the outer layer of the tooth, the enamel, is semi-transparent — it allows some of the yellowish dentin layer underneath to show through. This translucency gives the tooth depth and vitality. That “life-like” feeling actually comes from this layering of color.
A very white veneer destroys this translucency. A uniform, matte, flat whiteness is obtained. It looks perfect in the clinic mirror. But on the street, in different lights, or in photos, it looks like it isn’t “communicating” with the face. Your surroundings won’t notice specifically, but they will feel that something looks “artificial.” And you will feel it too.
For this reason, if you are considering laminate veneer treatment, making the right color decision is just as important as the technical decisions.
What Does the Shade Guide Actually Tell Us?
The standard shade guide used by dentists worldwide is the VITA Shade Guide. It has been in use since the 1950s and consists of four main groups:
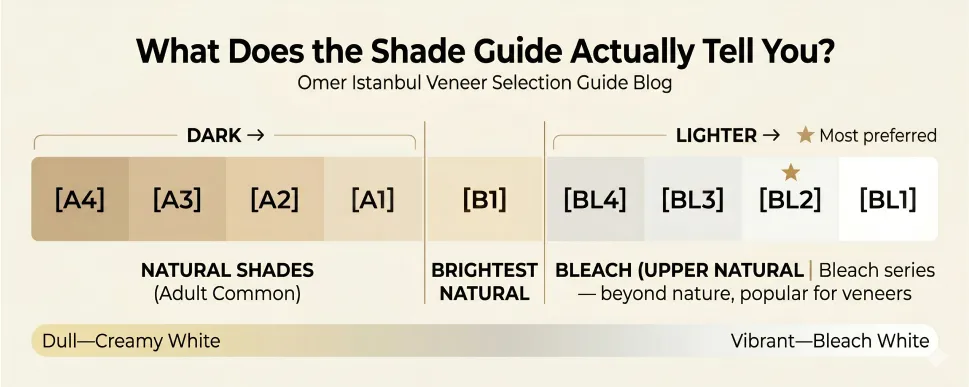
Group A — Reddish-brownish tones. Most common natural tooth colors are from here. A1 is the lightest, A4 the darkest.
Group B — Reddish-yellowish tones. B1 is the lightest in this group and is the shade many patients describe as “natural but bright.”
Group C — Greyish tones. Less common, rarely seen in natural teeth.
Group D — Reddish-grey. For special cases.
These 16 tones define the range of natural teeth. In other words, A1 and B1 are already the lightest, whitest ends of this scale — the whitest point natural teeth can reach.
But veneer patients often want something beyond natural. That’s where a second scale comes into play.
BL Tones: “Beyond Natural”
With the widespread use of teeth whitening technology, a need arose that exceeded the natural scale. The Ivoclar Vivadent company developed the BL (Bleach) series to fill this gap:
BL1 — The whitest, brightest. No natural tooth is this white. For those working in television broadcasts, on stage, or in front of the camera.
BL2 — Slightly softer than BL1. It still exceeds the natural scale but stands at the “striking yet realistic” boundary for most people.
BL3 — A transition between natural B1 and BL2. The shade many experts describe as the “most preferred veneer tone.”
BL4 — Just above the natural scale. Slightly lighter than B1.
In the production of laminate veneers, these BL tones are obtained by processing special pigmentation into the porcelain leaf ceramic — meaning it’s not a later dye, the material itself is this color.
Why is Skin Tone So Decisive?
Teeth are right in the middle of the face. The darker the surrounding color, the brighter the white appears. The lighter it is, the more dull that same white remains.
That’s why skin tone is the most critical variable in veneer selection.
Fair skin tone: Since there is no dark background, very white veneers can look disconnected from the face. BL3 or B1 usually gives a more harmonious result.
Medium skin tone: The most flexible group. BL2 or BL3 usually fits very well. Both striking and natural.
Dark skin tone: Since the contrast is strong, lighter tones look striking and natural. BL2, or even BL1, may not look overly exaggerated on these tones.
In smile design planning, skin tone assessment provides much more reliable results when performed alongside digital facial analysis.
Light Changes Everything
The color chosen under the strong spotlight of the clinic can look different outside or at home. This is called metamerism — the same color is perceived differently under different light sources.
Good clinics, therefore, perform color selection in multiple lighting conditions: under spotlights, in natural daylight, and in evening light. The tone that looks consistent in all of them is the tone that should be selected.
At Omer Istanbul, color assessment is done with digital color measurement devices and in different lighting conditions — technology steps in where the eye can be deceived.
“Try-In”: Test Before the Permanent
Many patients don’t know this, but there is a testing phase before veneers are permanently bonded: try-in.
In this phase, the veneer is placed on the tooth with a temporary substance — no permanent glue. You look at it, see it in different lights, talk, smile. You can ask yourself the question, “Does this suit my face?”
If something feels wrong — the color is too light, too cold, too matte — you need to say it at this stage. Any change after permanent bonding means producing a new veneer.
A good clinic is not one that skips the try-in phase. Just like the decision of zirconium or laminate, try-in is an indispensable part of the process.
To Avoid Making a Decision Under Pressure in That Chair
Color selection does not have to be made at that very moment when you come to the clinic.
The online consultation process at Omer Istanbul exists precisely for this reason. You send your photos and, if any, your reference smile images in advance. The team prepares possible tone suggestions based on your facial structure and skin tone. When you come to the clinic, you have already had this conversation — you don’t have to decide from scratch in the chair.
Which Tone to Choose? A Practical Guide
If the goal is a natural but significantly whiter smile: B1 or BL4
If the goal is a striking, modern, noticeable but not artificial-looking smile: BL2 or BL3
If the goal is a full Hollywood, stage-light smile: BL1 or BL2
If only a few teeth are being done (between 4-6): A selection close to the tone of your existing teeth is necessary, otherwise, the difference may be too prominent.
Time to Choose
Veneer color is an irreversible decision. If a wrong tone is to be changed after being permanently bonded, it means a new veneer production and a new cost.
That’s why this decision is not about choosing the whitest — it’s about choosing what suits you best.
And this needs to be done by thinking beforehand, not in five minutes in the clinic chair.
Frequently Asked Questions
Which color is most preferred for veneers?
As of 2026, the most common choices are BL2 and BL3. The vast majority of those who say “let it be noticed but not look artificial” decide between these two tones. BL3 is slightly more natural, BL2 is a bit more striking — both work harmoniously with most skin tones.
What is the difference between A1 and B1?
Both are the lightest natural tones of the VITA scale but belong to different color families. A1’s golden tone is a bit warmer, closer to a creamy white. B1’s tone is a bit cooler, closer to a blue-white. Most people describe A1 as “warm” and B1 as “bright.”
Does BL2 look too white?
It depends on the skin tone and how many teeth are being done. BL2 usually looks very beautiful with a full mouth of veneers on medium or dark skin tones. It might create too much contrast on someone with fair skin or if applied to only a few teeth. That’s why the try-in phase provides the best answer to this question — you see it for yourself before permanent bonding.
Can I change the color I chose later?
No, it is not possible to change the color after the veneer is permanently bonded. If you want a new tone, the existing veneer must be removed and a new one produced. This means both cost and time. Therefore, it is very important to make your color decision clear before the try-in phase.
If I only have veneers on my upper teeth, won’t there be an inconsistency with the lower teeth?
This is a frequently asked but often overlooked point. If the lower teeth remain very yellow next to the upper veneers, this difference can look distracting. There are two options: whitening the lower teeth beforehand to bring them closer to the veneer tone, or planning for both jaws together. This issue is specifically addressed in the Omer Istanbul consultation.
I really don’t know which color to choose — what should I do?
Collect reference images. Save a few photos from Instagram, Pinterest, or Google by searching for “smiles I like.” Bring these images to the clinic or the online consultation. Saying “I want something close to this tone” is a much clearer way than saying “a bit whiter but not too much.”